Stepping up to a display counter or clicking onto a web page of makeup brushes can be a little daunting for anyone. I mean just the names they have- professional, double ended, kits and sets, retractable, angled, mini size and full size, defining, blending, contouring; it is never ending. And some of the costs on these are unbelievable.
Now don’t get me wrong- I do believe in a good set of brushes to apply makeup. I think it saves you money in the long run. How? You save product if you use the right tools and learn how to apply it correctly. I mean- the eye shadow you purchase has that foam little brush to apply but think about this- it is made to throw away when you use up the shadow so how much money do you think the manufacturer spent on that little brush?
A good brand of brushes will last you many years if you keep them clean, storing them in an upright position. Find a good makeup brush cleaner that disinfects and conditions the brush fibers so that brushes will last longer. Follow the directions or go to youtube and type in makeup brushes and watch a few videos on cleaning them. Most important is to shape the damp brush back into the original shape to dry. Trim off any hairs that have come loose or are sticking out of the brush. Be gentle with them, no grinding them in your palm or towel to dry. Once dry, try to store your brushes so they are not crushed, flattened, or anything that will make them go out of shape. A pencil holder that you can buy at any office supply or major department store can be used, bristle side up of course.
How often do you clean your brushes? That will depend on how often you use them so only you can answer that question, but as a general, rule I clean all my brushes at least once a month. The ones I use most days, like the foundation brush, I clean every week or ten days.
The bristle of brushes comes in natural, natural/synthetic, and synthetic. I have all three kinds and the difference? Natural is softer bristles, synthetic is stiffer. And the cost can raise and fall with the bristle used in the brush. Natural is used more for powders while synthetic is used for liquids, gels. Not a rule but most brushes hold to this. Which is better? Both have a place in your set.
Now on to the basic set of brushes that I use. I am posting a picture of the brush, but not the brand, as I do not wish to endorse any brand. Following the picture will be an explanation on how the brush is used and a picture of me using the brush in that area, showing you how it is used. Let’s get started with the canvas known as foundation. *Note- these are unedited pictures so get ready to be scared.*
Foundation:
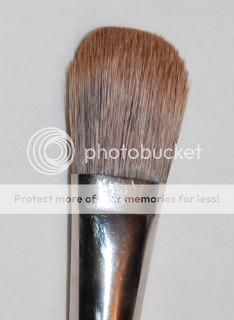
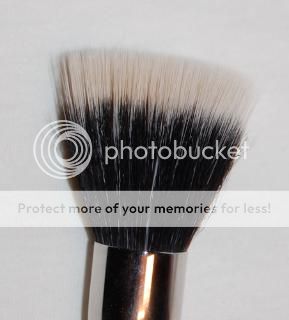
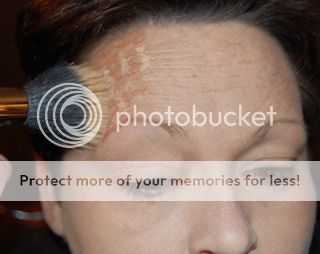
These are foundation brushes with which you apply liquid or cream style foundation. The first one you use like a paint brush, more or less. I will say this brush is one you have to get use to- but when you do, it does a wonderful job. Watch for streaks as you learn as this was my big issue with it. The bristles on the brush are stiff, making them synthetic. The other brush is used to dab on the foundation, sort of like when you paint a stencil on a wall. Note the white bristles are taller than the black ones, making it perfect for tapping on the foundation. This brush is soft, flexible to the touch because it is a natural bristle. With it you tap, tap, tap, to get a good coverage, then do a very light sweep to blend. For a heavier coverage you just keep applying in layers, making sure you use the proper foundation color so you will not end up with the dreaded tell tale line at your neck.
I find if you put the foundation in the palm or back of your hand and let it just warm from your body heat for just a couple of seconds before you start to spread, it goes on smoother. While these brushes are nice- I still us my hands most days, spreading it on like a lotion.
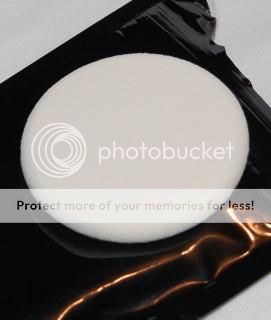
Of course the sponge is still a great fall back- easy to use with cream foundation. It is also easier to get into groves, tight spots like the area around your nose and eyes. Sponges are great to have on hand as they can do foundation, blush, and even eye shadow if you get a small enough one. Sponges used to come in a fit all use but now they are separate ones for liquids or powders. As this article is about brushes I will just say to read the package they come in for this information.

This type of brush is used to put on powder foundations. As with the liquids- layers are used to build the coverage you want. This brush can be used also for the setting powder that goes on top of the foundation, and blush. Just keep in mind you would have to clean them between each use so color is not mixed together on your face. One brush- three applications it can perform, equals money saved.
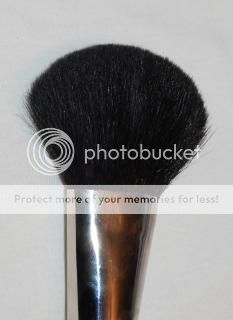
Powder:
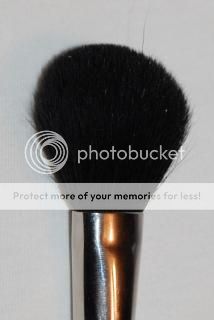
Setting powder comes in loose or compact style. Either way it can be applied with a sponge (note the one above) or with a nice fluffy brush. As it is to apply powder that would mean it is made of what kind of soft flexible bristles? Natural. :) See- you are getting the hang of it. This brush can also be used for powder foundation and blush. Understand- this brush is large, the area it covers will be also. When you use a brush for another application- keep that in mind.

All About the Eyes:
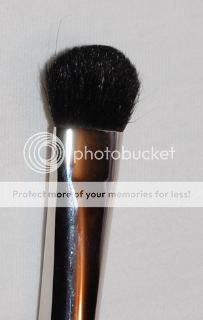
Now we come to the part of your face that will take several brushes if you wish to buy them. Below is a large brush that I use when I want to use only one shadow color, or just give my eye a base color to build upon. Note the slight curve of its top? This is nice to lie against the upper side of your nose/ inner eye, covering that area. Touch the side of your nose at the eye and you will feel what I mean.
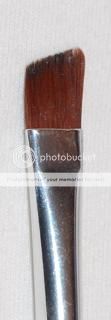
Now to see what an angled brush can do. This is a nice brush to have for the lid. The angle part gets into the inner eye, using the larger part to cover the wider part of the lid. Eye shadow wears better if you pat the color on, not swipe. Also the first place you place the brush is where the most color will end up. I try to start my lid with a tap on the center, one at the end, and the inner eye, and then use a genital sweep to fill in. The sponge applicator that comes with eye shadow you buy is nothing like a brush, and I think you use more product to get the same coverage when you use the sponge applicator. If you have a steady hand this brush can be used to do all the eye shadows application shown here, understanding you will need to use the tip, side, and the flat part to do so. You can’t put a thin line using the flat part, but the tip can. When you look at brushes you need to keep that in mind, all sides of the brush can be used.
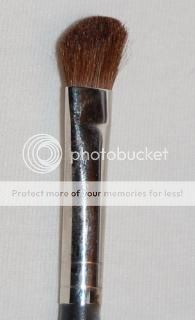

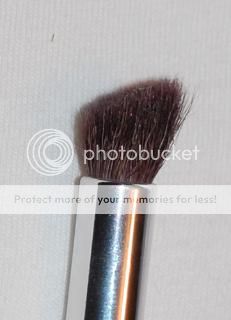
This is a contour brush for the outer V of your eye. What is the V? The shape they call where you put a darker eye shadow at the outer corner. Turn the V to the side, just shy of the center of your eye, the wider top at the outer corner of your eye. You shape the color in a sideways V- which is the reason the brush is shaped as it is to help you with this. Hint with a darker shadow- start light and add. It is hard to remove color but easy to apply more. I have ruined more than one look in this area with a dark shade that I tried to blend out, ruining the whole thing and had to start all over again. This is a contouring brush as it is made to match the natural shape of most faces.

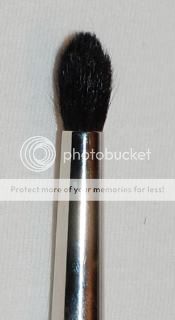
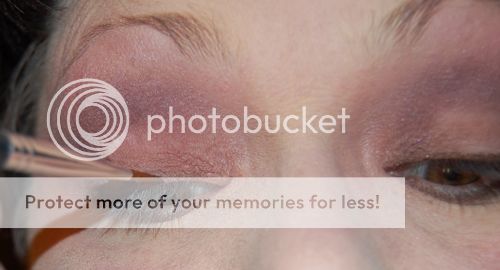
Now you have the highlight color which was the first base color, you have the lid color and crease color on. Do you see the lines between those colors? Now is the time for a blending brush. Or a crease defining brush as they are sometimes called. You can use this to add color to the crease in place of the above contour one as it does give you more freedom on what you can do with the brush, the above one limited by its shape. A hint about blending if you are not used to it- place three different color of eye shadows on the back of your hand, try making the sideways V, close together but not on top of each other. Now use the blending method on the lines between the colors. Too heavy of a hand and you blend the bottom two into one shade. The key is to use a light touch to blend the lines, nothing else. Use a swiping motion, back and forth, and a circular motion. With all the flexibility that is needed, most of the blending brushes are made of natural bristles.

Makeup under the eyes calls for a smaller, thinner brush. The use of eye shadow under the lash line can be used before you use a liner, softening the look. You can use your finger tip if you do not like brushes that close to your eyes. This brush can also be used for lip liner and lipstick with the understanding you have to clean after each use. Q tips are also a nice tool you can use in this area.


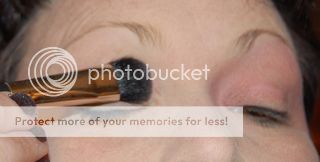
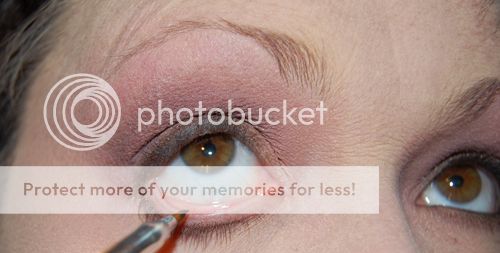
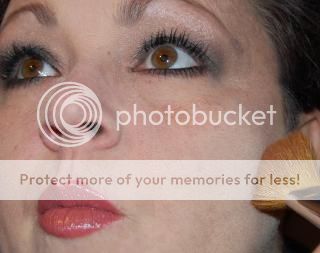
Liner brushes come in many shapes. Most are angled, others flat, but they all have a very thin edge. Do you need both kinds? No. You do need to think which one would be easier for you to use. This brush is used to draw the line directly above and below your eyelashes, right at the lash line. In the picture below you will see the eye on the left is done, showing you the copper color liner I picked to use. (This is the black line mostly used to "hide" the ban that fake eyelashes have, if you ever wonder.) Gel, creams and pencil liners can be applied with these brushes. If you only have pencil you just need to apply the paint, if you will, by rubbing it along the edge of the brush. This brush should have stiff hard bristles so that tells you to buy a ?? Synthetic brush. You are getting good. :) Why? Because you do not want it to lose its edge as you run it along your eye, getting that thin line. Note- this brush can also be used for the lips, both for the liner and lipstick. It can also be used to apply a gel or cream style eye brow color. Just remember to clean between each use. Now you see why most makeup lovers have many brushes in their kits.

Eyeliner brushes come in many shapes and sizes, but the brush part is always super thin. Unlike the liner brushes, eye liner needs to be soft. I will say this brush can be used instead of the liner as they both have the sharp edge. Some people think a softer brush spreads easier, while other like a stiffer bristle. It is really a personal choice. If you only want to buy one- go with this softer one. Why? The inner waterline is not a place I would put a hard stiff brush on as you might scratch your skin, hurting the tender skin. Angled ones are shaped to help you with the application, easier for most to hold in their hand. I hold my liner brush as I do an ink pen, bracing the three fingers on my cheek, pulling my skin down a little to bring the lid away from my eye. This steadies your hand and that makes for a cleaner sharper line, and less likely to poke yourself. If you have never done this- it takes practice. Human nature is not made to put something that close into your eye.

Time for the eyelash curler. If only I had a penny for every time I have pinched my skin with these! I have naturally long lashes so I don’t use them to make them longer, which is what they are used for. The love hate relationship I have with this item is a must, since at my age my eyelids are drooping, causing the lashes to curl downward. This is also a tool you cannot use once or twice and see a result. Every time you put on makeup- you must use it to get the benefit. So if I only wear make-up on the weekend? Nice try. I meant it has to be used several times a week. You place the item against your check to steady it, clamp the top lashes...easy so that if you have gotten skin you can pull away a little. Clamp, lift up just a little, release, and move it up the lash just a hair, if you don’t mind the pun, then clamp, lift, release. This shapes the lash, making it curl. I can get three clamps per lash, but I do have longer lashes. Do not tug, do not pull...clamp, lift upward a small amount, release, clamp again. Is it worth it? Yes- if you keep at it.


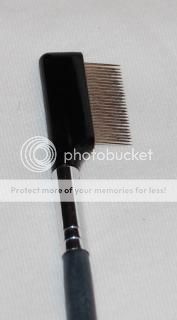
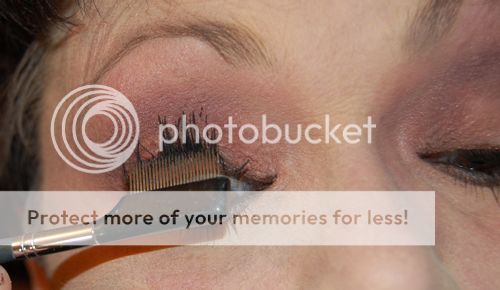
With the newer thicker mascara on the market I find I use a lash brush more than ever. Now they are formatted to put heavy coats on with the first application and sometimes you get clumps. They can be combed out with this, using care around your eye. Some are plastic combs, others metal. If you notice the clumps are getting worst then you might want to remember how long you have had the mascara. Dryness of the brush, clumps on the brush are signs that it is time to replace. How long do you keep mascara? That depends on how often you use it, the wand going in and out pushes air into the tube, making it dry, clump up, and bacteria builds up from use. I have read anywhere from two to six months. Better safe than sorry is my saying, so I do three months if it even last that long for me.
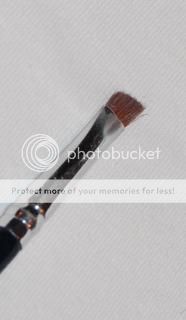
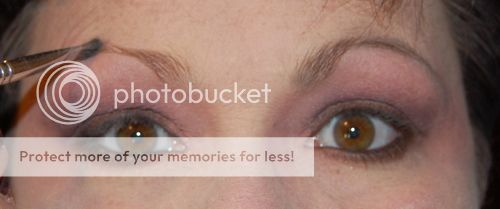
Brows are the most overlooked item on the face. Unless you are blessed with a perfect shape and color you have to give time to make them how you want. Brow color comes in a powder, gel; you can even use your pencil eyeliner if the shade is right. But I go with a powder color for this as I find gel and eyeliner too heavy of a look for me. Powder? You would think a soft brush. But remember- you want it to keep its shape, as you are shaping your eyebrow with this powder. So a stiff angled brush is used to apply. Take a look at the picture on the left side vs. the one I am working on- see the difference in the look. You can use the liner brush for the brows also, as it is better for gels and liner pencils as it has a more defined edge than this brush. And that was the last step to the eyes. Aren’t you glad?
Blush:
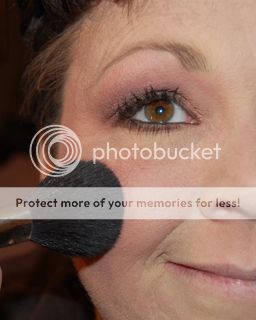
Now to bring color to those cheeks of yours. Blush brushes come in all different sizes and angled shaped as well. I go small with the blush brush as you can control where it goes better, not having it in places you did not want. I have a fuller face so I contour a little with an angled brush, using the top of the brush as it is thinner and leaves a nice shape line of darker color on the hollow of my cheeks. A trick if you don't know how to apply a contour is to suck in your cheeks like a fish. Then follow the hollow of your cheek up toward your ears- that will locate the place to apply your contour on most face shapes.

Adding blush is easy. As with the eye shadow you want to start light, adding more if needed. Using another old trick of smiling, the apple of your cheeks is shown below. I apply and brush into my contour color, making sure to blend into the contour color, which is a darker color than my blush in a circular motion. Another place to use the contour brush is to apply a small highlighter on your cheek. Put your hand under your eye; feel where the eye socket meets bone on the outer edge of your eye? Just a hint of lighter, even a little sparkle, can be applied with a very light touch in an L shape, just touching the top of the blush you just put on. It is sort of like the eye color- three layers. Do not go too close to the under eye area. It is tricky doing this, and practice on the back of your hand is a great way to get to see as you learn. They say blush should go where the sun kisses your face- top of your checks, chin, nose, and forehead. I use the blush very lightly if I do this, not wanting my foundation covered in blush.
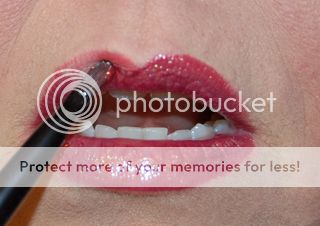
Lip Brush:
You can use this for both a lip liner and lipstick, if you clean it between use. If you plan to take this in your purse make sure you get one that had a lid, compact style. You will also need to clean this brush between different colors of lipsticks.

And so we are done, and here is the final look-

Just a few quick notes I want to add:
Ask any artist or photographer- the tools make the painting, the picture. But they would also tell you that you did not need all the items that are out in the market to make art. It is the same with makeup brushes. You can build your collection as I have over thirty years, but these are the brushes I would start with in my opinion.
When you go shopping for brushes- take a list of what you need. Think what it is being used for- does it need soft bristles, harder? Flat edge? Shaped in a certain way? Angled? Will it be used to contour? When you are looking at brushes- think how you can use it on other parts of your face. Like I have shown above you can use a brush for more than the listed use the store gives you. At the cost they need to do double duty. And if you take care of the brushes- they will last you for many years.
You do not need all the brushes listed above to get this look. Heck- you have ten brushes at the tips of your hands that cost nothing. Those ten little fingers can do a lot of blending, patting, rubbing, tapping and spreading. Just keep a baby wipe close to clean after each color. Speaking of baby wipes- I have used those to clean brushes if I need the brush for another application and do not have the time to clean with the cleaner and wait for it to dry.
If you were to ask me, "What do I get first as I build up my kit?" I would answer, “ Foundation brush.” It is the canvas all the color goes onto and if it doesn't look good- nothing else will. Then the eyes as they are what get the most attention on your face.
Now to list a few great places for beginners and experienced makeup users alike:
MAC: While I am not pushing these brushes I do love the website. It is very informative as they have brushes separated by face, eyes, blush, and lips. It is a great place to look at the styles, what each use a brush is listed for. And do not be surprised to see a brush in more than one category. You can even pick to show only natural or synthetic bristles. It is a great learning site.
Sephora: Has a lot of selection you will not find at your local drugstore. It is a great store to shop at, both in person and online.
Youtube: is a great place to see makeup tutorials, showing how they apply the makeup from start to finish. Here are a few of my favorite members:
panacea81
kandeejohnson
MissChievous
MakeUpGeekTV
MakeupByTiffany
jeanfrancoiscd
petrilude
**Check out your library for books also.
Next time you step up to the makeup brush counter, or click onto a web page I hope you can look at them in a new light, understand a little more about which one to choose. Remember- makeup is your way of expressing yourself. Never let anyone tell you what is right, what is wrong.
Enjoy what it means to be you.
|